Photography Tutorial
For pristine quality images
ONE - TWO - THREE
For pristine quality images
ONE - TWO - THREE
THREE - TWO - ONE
One f-stop = Three Clicks
This blog covers:
f-Stops, Shutter Speed, Exposure Metering. Aperture, ISO Noise, White Balance.
Also noted are Lumens, Color Temperature, Spot Metering, Color Shift/Bracketing, Point of Focus, and Bokeh.
An in depth look on the base requirements needed for professional photographers.
An in depth look on the base requirements needed for professional photographers.
We will be going by the settings on my Canon T1i dSLR. As most cameras are slightly different, please keep in mind that it may not be 100% accurate to your camera.
In the world of photography there are amateurs [AUTO] and there are professionals [MANUAL.] One of the defining differences in the two, is knowing every single setting on the camera. This blog is to educate you, the new or experienced photographer, to understand everything in the palm of your hands, to put more money in your hands. One of the main differences between amateurs and professionals, is the fact professionals are not afraid to make money. They are not afraid to educate their clients, build rapport, ask them for more business and make sales. Amateurs are about AUTO, point-and-shoot, and bohemian "free society." Where as professionals understand business, communication and relationships with a background in art.
When you are a photographer, you are a business owner. Being a business owner means you must know a lot about a little, to cover your bases. College or Junior College education is a bare minimum requirement. Marketing is most important, advertising is always needed, promotion and incentives are recommended for growth, communication is very important, sales isn't as important but helps with profits, accounting and taxes are most important for the real professional photographer. Knowing your local taxes allows you to tell your clients using you as advertisement making the business to business transaction tax deductible. Knowing the tax code also lets your gas become compensated, via tax deductions for mileage on your "business vehicle." Did you know that having a spare room become an indoor studio, allows you to tax deduct part of your personal rent, square footage, for "retail business space." Becoming a professional photographer means becoming more knowledgeable and more understanding of business, profits, and networking.
When you are a photographer, you are a business owner. Being a business owner means you must know a lot about a little, to cover your bases. College or Junior College education is a bare minimum requirement. Marketing is most important, advertising is always needed, promotion and incentives are recommended for growth, communication is very important, sales isn't as important but helps with profits, accounting and taxes are most important for the real professional photographer. Knowing your local taxes allows you to tell your clients using you as advertisement making the business to business transaction tax deductible. Knowing the tax code also lets your gas become compensated, via tax deductions for mileage on your "business vehicle." Did you know that having a spare room become an indoor studio, allows you to tax deduct part of your personal rent, square footage, for "retail business space." Becoming a professional photographer means becoming more knowledgeable and more understanding of business, profits, and networking.
Here is a breakdown of photography terms, with visual aids:
FPS: Frames Per Second.
This refers to the amount of frames [photos] capable of being taken in 1 second.
f-Stop: [This is not literal definition]
The degree of focal range, which is broken up into 3rds. ONE-TWO-THREE = One f-stop.
The degree of focal range, which is broken up into 3rds. ONE-TWO-THREE = One f-stop.
Often this refers to when a photo is properly exposed, in the middle of the light meter. When someone says "1 f-stop brighter" they are referring to the light meter, sensing light on a specific point, to be 1 f-stop brighter. Which means, you must move the shutter speed up 3 clicks, to achieve 1 f-stop darker.
1 f-Stop is basically ONE-TWO-THREE click adjustments up or down. An f-stop is basically light doubling or dividing by 2. From 12,000 lumens to 24,000 lumens... Or from 50,000 lumens to 25,000 lumens, would require 3 clicks left or right.
1 f-Stop is basically ONE-TWO-THREE click adjustments up or down. An f-stop is basically light doubling or dividing by 2. From 12,000 lumens to 24,000 lumens... Or from 50,000 lumens to 25,000 lumens, would require 3 clicks left or right.
This defines how fast the shutter moves to capture the photo. The faster the shutter speed, the less motion blur is created. Also, the faster the shutter speed the darker your image will become. In reverse, you can decrease the shutter speed to make the photo brighter at the risk of possibly getting a blurred subject from them moving or from you moving/shaking the camera. If you're shooting sports, theatre, or any subject that cannot be controlled and moves without predictability, you will need a higher shutter speed. This way, if they jet in the opposite direction, the photo does not blur as much with a higher shutter speed. Over 1/500 everything is basically stopped in motion, depending on the subjects speed. Most people stay around 1/200, as it's the highest shutter speed compatible with flashes and strobes. Some strobes are compatible up to 1/500 sync speed, but require more expensive cameras such as Canon 5D Mark III for high sync speeds.
EXAMPLE: High shutter speed = Sharp, vivid detail when zoomed in

This photo is f6.3, 1/160, ISO: 400
Lighting used: Golden sun reflecting from black glass window
EXAMPLE: Higher shutter speed = Sharper and detail when zoomed in
*NOTICE* You can see every single hair strand, on the bottom.
Compare to the image above in the red dress!
*NOTICE* You can see every single hair strand, on the bottom.
Compare to the image above in the red dress!

This photo is f7.1, 1/500, ISO: 200
Lighting used: Sun Studio™ Standing Sun Diffuser,with high noon sunlight
Lighting used: Sun Studio™ Standing Sun Diffuser,with high noon sunlight
 |
| www.SunDiffuser.com https://www.facebook.com/pages/Sun-Studio-Standing-Sun-Diffuser/370786526329291 |
LENSES: These are the centerpieces to photography. Just like the human eye, lenses have a focus range for optimum efficiency built in. You'll notice on almost every single camera lens the outer-most lens is Convex, meaning it's curved outward where you can touch it. This allows light to distort and expand the field of view so more in a nutshell more photo is visible. Cheap lenses have poorly manufactured glass, which gives off Chromatic Aberration and basically the sides of the frame are distorted. These distortions are extremely visible on cheap wide angle lenses or cheap wide angle "attachment" lenses. It shows as red or blue outlines on a subject when zoomed in. Most often it's buildings in the distance or group portraits you can see the outer details with ugly red or blue line highlights [often only 2-10 pixels wide, very small on a large image.]

The approximate field of view of an individual human eye is 95° away from the nose, 75° downward, 60° toward the nose, and 60° upward, allowing humans to have an almost 180-degree forward-facing horizontal field of view.[http://en.wikipedia.org/wiki/Human_eye]
The "built in zoom" to the human eye is around 50-80mm equivelant [depending if you have a lens on a full frame or a cropped sensor camera.] Hold up an object 1ft or so from your face, with your peripherals [non-direct gaze] notice the background is blurred to hell. Move it an inch from you eyes, ouch, painful right? Well everything has a minimum and maximum focusing distance. Same with lenses. The lenses that zoom often have several different Concave and Convex lenses inside. Some have 3 lenses and some have up to 8 lenses inside. The point of each lens is to narrow the field of view [imagine the human eye going from 95 degrees per eye to 30 degrees; like the james bond circle gun hole.] The secondary reason for so many lenses, is for precision focus an in reverse extremed Bokeh.

BOKEH: The blurring of a background and sharp focus on a subject.
Great Bokeh usually refers to a sharp, vivid subject, with a very fuzzy background. Popular with portrait and wedding photographers, to keep certain people the point of focus. What obtains good Bokeh? Better lenses. What are better lenses for Bokeh? Lenses with low aperture [f1.0 to f2.8 are considered low light and good for bokeh] Once you increase the aperture to f4.5 or higher, the background starts to become more apparent, more vivid also, and therefor less Bokeh or background blur. The downside to strong Bokeh is that unless perfectly focused on, say, an eyelash; the entire photo will be blurred. The focus parameters are so thin than if you shoot with f1.0 to f2.0 often the only thing in focus on a face is the eyeball and the nose, where as the neck, hair, etc; are all blurry. It's an acquired taste. However, with an expensive lens [EX: Canon 70-200mm f2.8 IS II] you can shoot f8 and because it has many internal "portrait glass" lenses inside, the background will still be blurred effectively. Where as a stock lens [Canon 18-55mm f3.5-5.6] will show an equal amount of background and foreground, this is because the internal glass is very simple. If you ever held a concave or convex lens to your eye, you would understand why the background can blur with more intensity when you have more internal glasses in play.
The cameras ability to read light waves and determine a specific area as perfectly lit up or exposed. Almost everything on the planet has more than 2 exposures in one photo. This is because when you have light, you must have shadows. Shadows are darker than the lit side of an object, therefor making the required settings on your camera to be brighter, to make the shadow properly exposed. By properly exposing the shadow, you make the lit side of the object overexposed. You must always determine what part of the photo you absolutely want to appear perfectly exposed to light.
WHITE BALANCE: Realistic and true to life color representation.
When you are in the shade, your eye is seeing more blue tones [from the sky reflecting down.] When you are in sunlight, depending on the time of day, it's seeing perfect white light [DAYLIGHT.] When your closer to sunset, you're seeing more of an orange and red light [TUNGSTEN.] White balance is in the camera to make adjustments and compensate for different times of day, different color temperature lights, and changing color variables. The color frequency of a camera is primarily red - orange - yellow - white - cyan - blue. Colors work in opposites, meaning if the light source [light on subject] is red, the camera will compensate with a lot of blue. If the light source is yellow, the camera will need to compensate with some cyan which is a light blue. If the light source is white, the cameras center is around 4600-5200k where 4800-5000k is roughly pure white. If some clouds broke up and you saw blue sky in some areas, the temperature would go up to 6000k or higher depending on how much blue is visible. White balance is a lot like painting, if you add a little bit of color it changes pigments completely.
KELVIN aka 5600k: What are people talking about when they say 5600k, 6000k, 6500k, 3300k tungsten, etc? "K" stands for Kelvin, which comes from Lord Kelvin (William Thomson) who originated the theory of associating the color a black body metal heated up to a specific temperature. Think about blacksmiths, dipping steel into hot coals. If they pull out a red steel rod, it's around 1500-2900k which stands for 2900 degrees kelvin. If the rod were white it would be around 4100k-5000k and if the rod were blue-white it would be 5100k-6000k. Well, the color intensity of light is measured from black to red to white to blue. Basically Black-red-orange-yellow-white-cyan-blue-purple. This is why you hear "Infra-RED" and "Ultra-VIOLET" for the extreme ends of visible and in some cases invisible light. Color Temperature or CT for short, is the practice of comparing lights color to the heated temperature of a black body metal. 5600k is common for flashes, which emit a blue-white light. Having blue in the light allows the skin to become desaturated [most skin tones have yellow/red, the opposite is blue, so by adding blue you de-saturate the skin.] De-saturating a photo in camera, in post production but most effectively with a light source allows you to control over-exposure and over-saturation which can destroy details in a photo. If you shine a red light onto red jeans, you most likely will not be able to see the threads. But if you shine a blue light unto red jeans, the red will be extremely desaturated allowing you 100% detail retention in the jeans. Flashes are primarily meant to be a quality control device and allow a photographer to control/manipulate a lighting situation to their advantage. Flashes are at 5200-5600k to mimic broad daylight. Sometimes flashes are more pure white, 5200k, at lower power settings. Where as 5600k blue-white is reserved for the powerful max settings. Some on camera flashes mimic cloudy days, around 6500k.
APERTURE: f1.0 has a very narrow point of focus where as f22 shows almost everything in focus.
Let's say it like this: f-1 is 10% of focal range [close/far] is shown, where as f22 would show 90% of the entire focal range.
That's my simple definition, at least. The more politically correct definition, is how open your shutter blades are. When your shutter blades are wide open it let's a lot more light through the shutter to hit the sensor and this is known as nice glass or optics where your aperture is around f1.0. However, nice glass really refers to the internal concave/convex system of glassware lenses on the inside of a lens. Heavy glass is usually much higher quality as a lot of "glass" is actually plastic based. If it's expensive f1.2 portrait glass lens, no matter how high the Aperture is the lenses or glass are made and shaped to still give off a background blur.
Now, when your shutter blades are closed more, it lets less light hit the sensor, therefore making the image darker. When you take a photo and you want to focus on a very tiny area and only have focus on a very specific pinpoint with the background a blurry mush, f1.0 will do that. When you want to take a landscape, or have the background very visible from close to far, f22 will do this well. Everywhere in between f1.0 to f22 is basically different intervals of trading background focus to focus on just the subject. Here is an example of the ONE-TWO-THREE method I use, referring to "One full stop" as three clicks up or down. There is Aperture 1.8, however, most cameras allow you to break each f-stop up 3 times. So instead of f1.8 straight to f2.5, you get f2.0 - f2.2 - f2.5. This allows you much more quality control on your images. Here's an image sample to cement this:

Now, when your shutter blades are closed more, it lets less light hit the sensor, therefore making the image darker. When you take a photo and you want to focus on a very tiny area and only have focus on a very specific pinpoint with the background a blurry mush, f1.0 will do that. When you want to take a landscape, or have the background very visible from close to far, f22 will do this well. Everywhere in between f1.0 to f22 is basically different intervals of trading background focus to focus on just the subject. Here is an example of the ONE-TWO-THREE method I use, referring to "One full stop" as three clicks up or down. There is Aperture 1.8, however, most cameras allow you to break each f-stop up 3 times. So instead of f1.8 straight to f2.5, you get f2.0 - f2.2 - f2.5. This allows you much more quality control on your images. Here's an image sample to cement this:

LIGHT METER
SPOT METERING
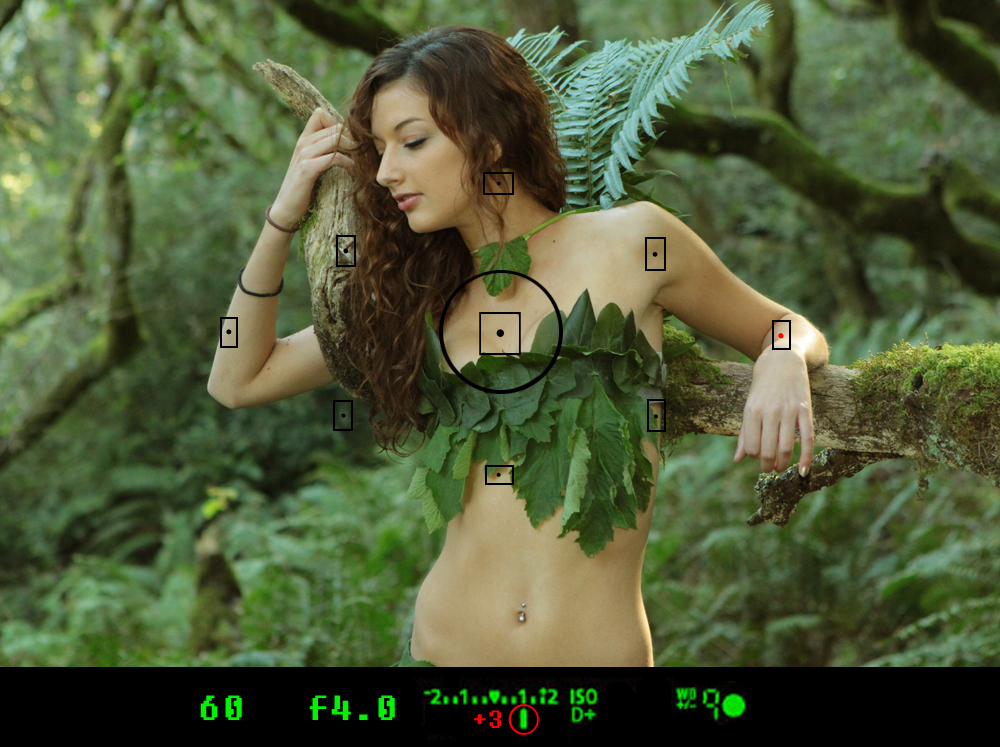
The main thing you must understand about your camera, is the setting that makes AUTO work. The reason why, is when in manual mode, you must select a specific point of focus and exposure. In AUTO, this basically means the little dot in your viewfinder, sets the proper exposure for the whole photo. As seen below, the red dot in the center highlights the area to be focused and the proper exposure for it as well, when gently pressing down the shutter button, to obtain focus on this specific point and check the exposure meter bar at the bottom of the screen. For the example, I chose the chest to focus and meter light:

This little red dot, is the "Spot" in Spot Metering. Below is a detailed image showing you the three most common metering methods. Each has a topographic projection of the area of light measured around the spot. I'm using "Spot Metering" for examples, because it is the most pinpoint accuracy for gauging the light meter and exposure perfectly.

Under manual mode, the same is true, except you must manually adjust settings, while looking at the exposure meter on the bottom of the view finder to verify the exposure is perfectly in the middle, or brighter to lift shadows as a preference. If the exposure meter [circled in red] reads to the right, the point you chose is too bright and will require you to manually darken the photo via smaller Aperture or a higher Shutter Speed. For this example below, I metered her arm which is slightly over-exposed from the sun peaking through the trees. If I wanted that specific part of her arm to be perfectly exposed, I would darken the photo 1 f-stop or 3 clicks up of the shutter speed.
ONE TWO THREE clicks = 1 F-stop!
To cement the idea of proper exposure in a photo I will give you one more example, with the same photo. This time I'm purposely selecting the dark background for light metering and as my focal point. Immediately, the subject becomes blurred and the background becomes focused. Also, the light meter at the bottom is alerting you, that your current settings, are now too dark. Now you are required to lighten the photo by 1 2/3 f-stop, meaning 5 clicks down for the shutter speed or 5 clicks up for the Aperture.
ONE-TWO-THREE-FOUR-FIVE clicks brighter = +1 2/3 f-stop

When you decide to not rely on AUTO, you are left with 1 instrument to determine the proper light exposure of a photograph. This is the light meter. If you turn on your camera, in manual mode and select a subject; you can tap the shutter butter to gauge your available light. Right away it will click +2 stops bright, or -2 stops dark. If the light meter is blinking under +2, that means you need to darken the photo for it is too bright. Simply increase the shutter speed a few clicks, tap the shutter button, and see if the blinking arrow is closer to the middle. Keep doing this until the blinking light is right under the center, for the spot you selected to set the exposure to. You can adjust the aperture or the shutter speed or the ISO to maintain a proper exposure.
Higher ISO - Will make a photo brighter, but it will add fuzzy and colorful artifacts. Grainy.
Shutter speed - Lower speeds [1/13] won't capture movement, high speeds freeze any motion [1/500.]
APERTURE
Now that basic light metering is covered, using a Spot Metering method, let's talk about Aperture and how it effects images. This is a complicated area, so let's keep it simple:
A higher f Number lets you see more of the whole photo
A lower f Number limits the amount the photo that is in focus.
f22 = You can see the whole photo, from close to afar, called "Infinity focus"
f1.8 = You can see a very specific area, such as a person standing, with the background blurred out
Keep it simple, stupid!
Low F
Low f-stop = Low % of foto in Focus
High F
High f-stop = High % of foto in Focus
f-Stop = focus range
f-Stop = focus range
[Beginner definition, not Webster's definition.]
Here are two examples. Keep in mind, I rarely shoot with the real f1.8 or f22 settings. Normally the lowest I'll go is f2.8 [because f-1.8 blurs almost everything besides, say, an eyeball] and f16 is the highest I'll go because f22 generally makes the photo too dark. f16 is for fashion [strobes] and f4 is more for portrait photographers.

f4.0
No background
Subject in focus
Photo is about subject
This background is blurred
Mainly because of the $3,500
Canon 70-200mm f2.8 ii lens.

f14
Full background
Subject's focused
Background's focused
Photo is about subject and background
This photo used a basic Canon 18-55mm f3.5-5.6 Kit Lens.
I used the built in flash to fill the shadows on her bodies center.
I used a 6ft, self made, chrome reflector to light her right side.
ISO / NOISE
A photo that is sharp, vivid, smooth and yet still textured is considered professional grade. Using more ISO tends to bump down the actual quality of the image that is capture by the camera's sensor by adding noise. Noise refers to the fuzz as well as red, green, and blue artifacts that will show up with a higher ISO. Noise is like your old television, with black and white specks shuffling around the screen, it's annoying.
Having a higher ISO means your photo will appear one f-stop brighter. This means, if you go from ISO 100 to ISO 200, it's the same as clicking your shutter speed down ONE-TWO-THREE clicks, to make the photo brighter. ISO allows you to increase the photo's brightness, without lowering shutter speed [and sacrificing sharp photos.] The only negative part about ISO, is it adds these weird little red, blue, and green specks throughout the photo. It also doesn't allow as much detail to show up on the final photo ISO is basically the same as squinting your eye. Your eye lashes sort of diffuse the light, but they make objects less crisp, fresh, and vivid.
Journalists use high ISO, because it allows them to capture things like war, weddings, live events and capture fast moving objects while they don't care if a few weird "artifacts" show up in the photo as long as they got the photo. Portrait, advertisement, artistic and entertainment photos generally prefer little to no noise, as they want the crispest, vivid, most detailed and clean photos as possible.
Remember, ONE-TWO-THREE clicks
Increasing ISO, such as 100 to 200, is one f-stop, three clicks.
This means, you click up the shutter speed from 1/200 to 1/400.
Three clicks = 1 f-stop
ISO: 100


Clearly ISO 100 is my favorite to use during mid day, as there is so much light
available. I can use a higher shutter speed, such as 1/500 in this photo, to achieve
awe-struck quality and texture. I could bump up the ISO to 200 if I wanted to
shoot 1/1000 instead, but I wanted absolutely no distortion from the ISO.
Having the shutter at 1/500 and using a tripod like I did here, guarantees
I would get an insanely vivid photo at no cost of quality integrity. The stunning light you see in this photo was obtained with my new outdoor lighting product, the RA SCREEN™. It's a portable standing sun diffuser, which stands on it's own and is 4ft by 9ft white fabric that diffuses the sunlight into a beautiful soft light. Coming soon to a market near you!!
ISO: 800

As you can see, the most common use for ISO 800 would be a lowly lit room or
Indoor photography. You can bump up the ISO one more to 1600 or one more to
3200, but it will only degrade the photo. For a sharper but not as pleasing photo.
Do you want quality or sharpness?
ISO: 1600

When ISO 800 isn't quite helping brighten the photo, it's time to bump it to 1,600
So you can get 3 clicks more on shutter speed. This is mainly for a low light room.
You can bump up the ISO one more to 3200 but it will only degrade the photo.
It's sacrificing a possible blurred photo
For a sharper but not as pleasing photo.
Do you want quality or sharpness?
ISO: 3200

In this photo you can tell by the red, blue, and green artifacts that my ISO was cranked up to max. However, the higher ISO of 3200 allowed me to capture this moment in time, of the groom shoving the new brides garter into his best man's shirt pocket. He did it lightning fast, in an almost pitch black tent. The only lighting is the tiny bulbs you see lining the tent, which to a camera, is nothing! So I chose ISO 3200, which allowed me to have a shutter of around 160 or so, with the help of flash it allowed me to capture this moment without any blurring. Lacking in quality, but not in sharpness!
WHITE BALANCE
Every time of day yields a different color temperature. Color temperatures can be complicated, but once you understand them, the idea becomes painfully simple. Let me give you an example. The sky is blue, the sun is yellow. Wherever the sun shines, it's more yellow. Wherever the sun doesn't shine, the sky still reflects light back into the shadow, guess what color; blue! Yes, it is THAT simple.
Now that you understand why shadows are blue [the sky bouncing light] and white objects are warm-yellow [the sun] let's get into why this is happens. The light around us is formed in different spectrums, which can be broken down into temperatures. The color temperature is determined by the color frequency of light. Try lighting a room with 1 candle, it's very red, whatever you can see.
Try lighting a room with 100 candles, it's a little more orange or yellow; isn't it?
Try lighting a room with 1,000 candles, it's more yellow than red now; isn't it?
Try lighting a room with 4,100 candles, it will be HOT AS HELL, literally; but perfect colors.
Now, let's take the sky out of the equation. Let's say you have a mid-day, white-light, flourescent bulb with a perfectly balanced white color of 4100k color temperature. This means the light has the brightness of 4,1000 candles and you can use the "Flourescent" setting in your camera, as there are no additional colors added to the light, it's called "Cool White."
Once you have the perfect setting in your camera, let's say your subject is in a black box. You shine this cool white on them from their right side. Instantly their right side is perfectly lit. What color are the shadows, that will appear on the left side be? They will be black. Why is this? Because your subject is in a black box which will reflect your cool white light onto the subjects shadows. Since black is, well black, your shadows will remain rather dark yet pure in color.
If you had the subject in a grey box, the shadows would be brighter, yet still true to color.
If you had the subject in a white box, the shadows would be almost completely lifted, as white will reflect your white light into the shadows.
If you had the subject in a red box, the shadows would appear brighter but with a red hue.
If you had the subject in a green box, the shadows would appear brighter but with a green hue.
Getting the basic idea?
You can have a light on a subject, and have them perfectly color balanced [white balanced] for the light source. However, all the objects around them will change the color of their shadows. Backgrounds are very important to making sure the shadows appear how you want them to.
Your camera has a White Balance to assist you in changing colors for different color temperatures. Tungsten has the most blue and green added to the photo where as Shade has the most yellow and red.
What your cameras White Balance does:
TUNGSTEN - Adds a lot blue and green
Use if: The environment has TOO much red and yellow
FLOURESCENT - Adds a little bit of blue and green
Use if: The environment consists of white-light, flourescents
DAYLIGHT - The perfect balance of red, blue, yellow and green.
Use if: You want flourescent light to look warmer or you are outdoors
CLOUDY - Adds a little bit of red and yellow
Use if: Your environment is grey, boring, or slight clouds covering sun.
SHADE - Adds a lot of red and yellow
Use if: Your environment has too much blue and green in it

Let's give you a visual aid now, using a photo I took in a tree canopy.
What's coming to mind? Lots of shadows? Green leaves? Brown trees?
Instantly, you should have the mindset, that the photo will have less blue [sky] less yellow [sun] and more green [leaves.]
Here is what the photo would look like with a white balance of TUNGSTEN

Here is what the photo would look like with a white balance of FLOURESCENT

Here is what the photo would look like with a white balance of DAYLIGHT

Here is what the photo would look like with a white balance of CLOUDY

Here is what the photo would look like with a white balance of SHADE

After viewing all the settings for being under a canopy, in the shade, you can clearly see adding more red and yellow benefited the overall color balance or "White Balance." But is it just me or would it be perfect and realistic colors if Cloudy and Shade combined to meet in the middle? Shade is a little too yellow and green, where as Cloudy is a little too blue and red. What to do? Well, you can go even more in depth and tweak the colors up or down!
In my Canon T1i DSLR I am able to adjust colors on a pinpoint scale by visiting the "WB SHFT / BRKT" area. Which is short for "White Balance Shifting & Bracketing."

In my Canon T1i I select "WB Shft / Brckt" from the MENU Button. Every camera has different software, so your DSLR will have it as well, but it might be a whole lot harder to find.

Once in, you see 4 colors, and 9 grid points. This means you can add 11.11% of each color per point.
B - Bue
G- Green
A - Amber
M - Magenta

In our last photo, we applied the SHADE White Balance preset. It had too much red and green. So, in turn we should take away red and green.
We can do this by adding more blue and magenta. Given that the leaves are green, lets only +2 magenta, to balance the greens. Then +4 blue, to balance out the reds.
Perfect White Balance:
SHADE +4 Blue +2 Magenta

WB: Shade, 1/60, f4.0, ISO 1600, Fill flash with Speedlight at 70mm.
Triple AAA Standard
1) Assess
2) Apply
3) Adjust
Setting your white balance requires 3 main steps. It's the Tripple AAA gauruntee!
1) ASSESS - What colors are most ambiently displayed in the area my camera lens is pointed?
2) APPLY - What colors must I add to the photo, to make the color tones even?
3) ADJUST - Is there still too much of one color?
When you think about it, there are so many degrees of color balancing, how is it even possible to get a PERFECT white balance? Well, I'm glad you asked! You can actually use a white piece of paper or a grey piece of paper. Put the piece of paper in front of your subject, set the exposure for the paper, and then simply adjust the colors until it's perfectly grey! Looking for something more portable, with white, grey, and black neutral color references? Glad you asked that also, here is a link below.

$25
White Balance Cards
[Doubles as reflectors]
http://www.amazon.com/Fotodiox-Collapsible-Tri-Fold-Reflector-Balance/dp/B003Y2KCMM/ref=sr_1_13?s=electronics&ie=UTF8&qid=1329979812&sr=1-13
BRIGHTNESS
When you want a brighter photo, what do you do? You can bump the ISO or find a way to shed more light unto your subject. How can you get more light in a studio with no windows? Easy! You can just buy an addition light bulb, open a window more, or buy a BIGGER light bulb.
Light is measured in color temperature [EX: 4100k is cool white light] but it is also measured in volumes meaning the brightness. For a brighter light, add an addition light, thus multiplying the light output, or "Lumens" by 2 times.
Lumens are basically a data count for the amount of light being shun into the atmosphere. With 1 candle light flame you have 12.57 lumens. Basically, 10 lumens per candle.
300 lumens = Household light
1,200 lumens = Flourescents
2,200 lumens = Worklight / Flourescents
3,000 lumens = Spotlights / Outdoor lights
6,000 lumens = Large "household base" CFL's or Spotlights
9,000 lumens = Large "mogul base" CFL's or Metal Halide Spotlights
24,000 lumens = 4 lamp 4ft CFL fixtures or Metal Halide fixtures
80,000 lumens = HMI aka the higher quality Metal Halide fixtures
1,500,000 Lumens = Noon Daylight, flashes, and strobes.
4,500,000 lumens = Studio Strobes
5,000,000+ lumens = Extremely expensive strobes
Lumens can go up to and past 1Million lumens, which happens when you use very vibrant reactive light, focus it like a laser into a specific channel. These insanely bright lights are most common in industrial strength spotlights, like for grand openings, or the most common is the Luxor Pyramid in Las Vegas. It's a 50Million Lumen spotlight that emits a white light into the sky you can see from plane and in the clouds.
P.S.
For those of you looking to build up indoor photography portfolios, please learn from me and purchase lighting around the 5000k color spectrum known as Daylight. Often fluorescents, HID, and Metal Halide bulbs have a green spike in them. This is because a gas is ignited in the filament of the bulb, generating light, but the mercury vapor is actually an intense green light. A white diffused cover is often painted on and special phosphers are coated on the inside to balance the bulb with magenta to get rid of the green. You can't SEE the magenta, you have to test the bulb. The safest thing to do is to ONLY BUY bulbs with a CRI of 90+. CRI is the Color Rendering Index. A higher CRI assures whatever the color temperature, the colors in a photo or to the eye will appear closer to pure daylight.
CRI 40-70 = Horrible green cast / color rendering
CRI 80-90 = Decent, but very visible green cast
CRI 90-94 = Really good color rendering, slight green cast
CRI 96-99 = Absolutely amazing colors, no green cast, well balanced. EXPENSIVE!!!
To purchase 5000k bulbs, you can either buy Flourescent tubes or CFL energy efficient bulbs which are also Flourescent. Here are a few links for the light bulbs, that will fit into any normal house-hold lighting base socket. Most photographers tend to use Daylight bulbs, from 5,000 to the 6,500 spectrum, then fix any green hue cast in Post Production. You can also buy some magenta mesh fabric and wrap it around the T8 or T12 lamps to get rid of the green cast. Yes, this works! I wrap another white fabric around the outside to keep it looking nice.
P.S. Now I used GE Cinema lamps and Kino Flo lamps, I can hotwire them anywhere and clamp them up to anything. But that takes electrical engineering, something I won't teach for safety reasons ;-]
.jpg)
$0.00 per unit
100,000 Lumens:
The sun. on a clear and bright day, is 100,000 lumens. On a cloudy day it's around 50,000 lumens. On a dark cloud day it's around 25,000 lumens.
Moral of the story
High ISO = Brighter, less quality
High Shutter = Freeze motion, amplify quality
Low Aperture = Crisp subject, blurred background
Color Temperature = The color of visible light
Color Temperature = The color of visible light
White Balance = Realistic color representation
Lumens = More lumens means more light output
Lumens = More lumens means more light output
Green Cast = Sickly green hue from CFL / HID/ Metal Halide
Knowing these four settings and how to adjust them accordingly allows you to obtain pristine quality images. Higher shutter speed means crisper focus on details with less chance of blur. Low aperture allows you to only have a subject in focus and everything un-important out of focus and blurry. And finally, when you don't want to sacrifice a lower shutter speed, you can pump up the ISO to keep the photo sharp, although some weird artifacts may show up after ISO 800.
Thank you for reading and if you have anything you would like to add, something that's missing, more visual aids; please let me know! This blog is for beginners and intermediates to give you the skills to obtain quality images. The composition, emotion and artistic ability is in your court!
Please Share
On Facebook or Google+
Educate yourself, educate your friends!
No comments:
Post a Comment